

A successful EPDM roof repair workflow is defined as a structured sequence of inspection, surface preparation, patching, edge sealing, and scheduled maintenance that produces a durable, watertight result. EPDM, which stands for ethylene propylene diene monomer, is the industry standard term for the synthetic rubber membrane widely used on low-slope commercial and residential roofs across the Dallas-Fort Worth Metroplex. When property owners and facility managers skip steps or rush the process, repairs fail within months. Follow the right sequence, and a properly repaired EPDM roof can deliver years of additional service life without a full replacement.
What materials and tools do you need for EPDM roof repair?
Gathering the right materials before you start is the difference between a repair that lasts and one that peels up by next summer. Basic EPDM patch kits start at around $25 for DIY materials. That low entry cost makes EPDM one of the most cost-effective membranes to maintain, but only when you use compatible products throughout.
The DFW climate adds a layer of complexity. Summer temperatures regularly exceed 100°F, and humidity swings between seasons affect how adhesives cure and how primers behave. Always check that your adhesive is rated for high-temperature applications. Water-based contact adhesives perform well in DFW’s heat, while solvent-based options can off-gas too quickly in direct sun, reducing tack time.
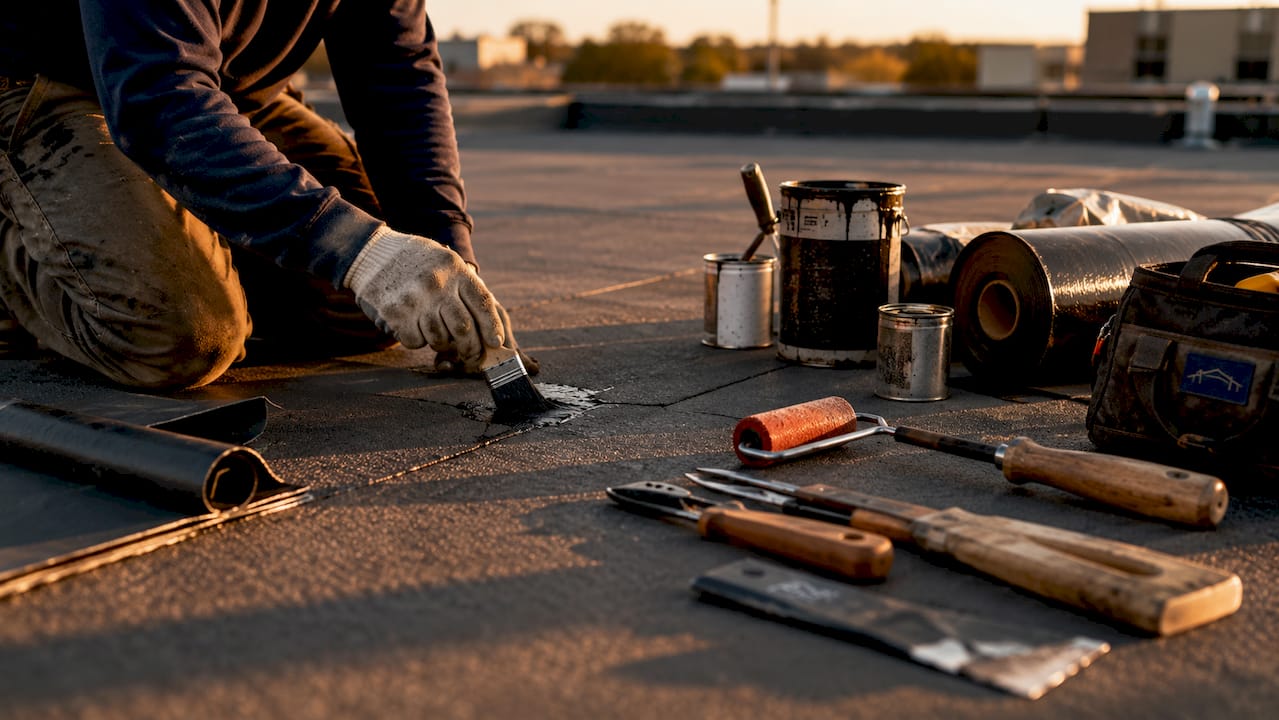
| Material | Purpose | Quality note |
|---|---|---|
| EPDM patch material | Covers tears, punctures, and seam gaps | Match membrane thickness; use factory-cured EPDM |
| EPDM-compatible primer | Promotes adhesion on cleaned surfaces | Avoid asphalt or silicone-based primers |
| Contact adhesive or splice tape | Bonds patch to membrane | Confirm compatibility with existing membrane |
| Lap sealant | Seals patch edges | Use EPDM-specific formulation only |
| Seam roller | Presses out air and ensures full contact | Metal roller preferred over plastic |
| Utility knife and scissors | Cuts patch material cleanly | Sharp blades prevent ragged edges |
Pro Tip: Buy a small amount of primer and test it on a hidden section of your membrane before committing to a full repair. Adhesion failures occur when old incompatible sealants are not removed, and a small test area confirms your products will bond correctly.
How to inspect and identify damage on your EPDM roof
Accurate inspection is the foundation of any effective EPDM roofing repair process. Twice-yearly inspections, ideally in spring and fall, catch minor issues before they grow into expensive problems. In DFW, the spring inspection addresses damage from winter ice and hail, while the fall check prepares the roof for temperature drops that stress seams and flashings.
Walk the entire roof surface systematically. Do not limit your inspection to the area directly above a visible interior leak. Water wicks between the membrane and substrate, traveling far from the original breach. Infrared thermographic scanning locates true leak sources by detecting moisture trapped beneath the membrane, preventing you from patching the wrong spot entirely.
Look for these specific damage indicators during your inspection:
- Tears and punctures: Often caused by foot traffic, falling branches, or HVAC equipment vibration
- Seam separation: Edges lifting at laps or T-joints, especially after thermal cycling in DFW summers
- Ponding water: Standing water after 48 hours signals drainage problems that accelerate membrane degradation
- Flashing failures: Gaps or cracks where the membrane meets walls, curbs, or penetrations
- Surface chalking or crazing: Fine surface cracks that indicate UV degradation and reduced membrane flexibility
- Blistering: Bubbles beneath the membrane surface caused by trapped moisture or adhesive failure
Document every finding with photos and written notes. A dated maintenance log protects you during insurance claims and helps track whether a repaired area is holding. Griffith roofing recommends keeping a dedicated roof file for each property, updated after every inspection.
Pro Tip: Bring a piece of chalk to mark damage locations as you find them. It washes off in rain and saves you from losing track of small punctures on a large roof surface.
Step-by-step EPDM roof repair workflow: preparation, application, and finishing
The EPDM repair process follows a fixed sequence. Skipping or rushing any stage undermines the entire repair. Work only when temperatures are between 50°F and 90°F, humidity is below 85%, and no rain is forecast for at least 24 hours. These conditions are not always easy to find in DFW, so check the forecast carefully before you begin.
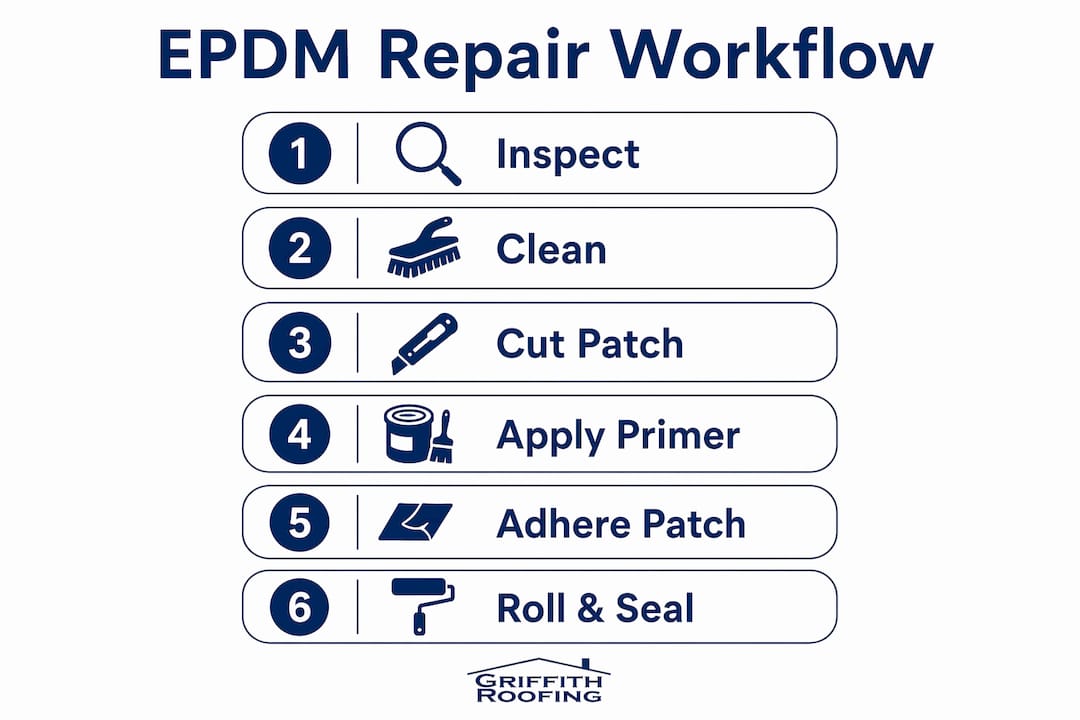
Step 1: Clean and prepare the surface
Surface cleaning is the most critical step in the entire repair workflow. Contaminants block adhesion and cause patch failures, no matter how good your materials are. Use a clean cloth and an EPDM-compatible cleaner or isopropyl alcohol to scrub the repair area and at least 6 inches beyond it in every direction.
Remove all old sealants completely. Silicone and asphalt-based sealants are incompatible with EPDM adhesives and must be scraped away with a stiff putty knife, then cleaned with solvent. Any residue left behind will prevent bonding. Let the surface dry completely before moving to the next step.
Step 2: Cut and size the patch
Cut your EPDM patch material so it extends at least 50–75mm beyond the visible damage on all sides. For large tears, cut out the damaged section entirely, removing 10–20cm beyond the visible tear to eliminate microscopic stress fractures that are invisible to the eye. Round all four corners of the patch with scissors. Square corners lift under thermal movement; rounded corners stay bonded.
Lay the cut patch over the repair area dry before applying any adhesive. Confirm it covers the damage with full overlap on all sides. This dry-fit step takes two minutes and prevents costly repositioning errors once adhesive is applied.
Step 3: Apply primer and wait for tack
Apply EPDM-compatible primer to both the patch underside and the cleaned membrane surface. Use a paint roller or brush for even coverage. Do not skip the primer step, even if your adhesive label says it is optional. Primer dramatically improves long-term bond strength on aged membranes.
Wait for the primer to reach the correct tack stage before applying adhesive. This typically takes 15–30 minutes depending on temperature and humidity. Ignoring tack time is one of the primary reasons DIY repairs fail within the first year. The adhesive must be tacky, not wet, when you bring the surfaces together.
Step 4: Apply adhesive and place the patch
Apply contact adhesive to both the patch underside and the membrane surface using a paint roller. Allow both surfaces to reach full tack before joining them. Fold the patch in half, adhesive side in, to carry it to the repair area without touching the adhesive. Align one edge carefully, then unfold and press down from the center outward to avoid trapping air bubbles.
Alternatively, self-adhesive splice tape eliminates the open-time variable entirely and performs well in DFW’s heat. Peel the backing and press firmly from one end to the other in a single smooth motion.
Step 5: Roll and seal edges
Use a metal seam roller to apply firm, even pressure across the entire patch surface. Roll in overlapping passes from the center toward the edges. This step removes any remaining air pockets and ensures full membrane-to-membrane contact.
Apply lap sealant around all four edges of the patch immediately after rolling. Neglecting this step leads to edge lifting and repair failure. Run a continuous bead of EPDM-compatible lap sealant along every edge and tool it smooth with a gloved finger. Allow the sealant to cure fully before exposing the repair to foot traffic or rain.
Pro Tip: Apply a second pass of lap sealant 24 hours after the first. The initial bead sometimes shrinks slightly as it cures, and a second coat closes any gaps before they become entry points for water.
How to maintain and inspect repaired EPDM roofs for longevity
A repaired EPDM roof does not maintain itself. Consistent follow-up is what separates a repair that lasts five years from one that fails in twelve months. The EPDM Roofing Association confirms that EPDM retains flexibility and remains repairable well into its service life, unlike membranes that become brittle and require premature replacement. That advantage only holds when you maintain the system actively.
Schedule your regular roof inspections twice a year in DFW, with additional checks after major hail events or severe storms. During each inspection, pay specific attention to previously repaired areas. Check that lap sealant edges remain intact and that patch corners have not lifted.
Your ongoing EPDM maintenance checklist should include:
- Clear all drains and scuppers to prevent ponding water from stressing repaired sections
- Inspect all flashings and penetrations for gaps, since these are the most common new leak sources
- Check patch edges for any lifting, cracking, or sealant shrinkage
- Remove debris like leaves and branches that trap moisture against the membrane
- Document the condition of each repaired area with dated photos
Call a professional when you find new damage adjacent to a previously repaired section, when ponding water persists after clearing drains, or when the membrane surface shows widespread crazing. Spot fixing without inspecting the wider roof risks missing systemic issues that will cost far more to address later.
Pro Tip: Set a calendar reminder for your spring and fall inspections right now. The DFW spring inspection window is narrow. Hail season starts in march, and you want your roof assessed before the first major storm of the year.
Key takeaways
A systematic EPDM roof repair workflow, built on thorough inspection, proper surface preparation, correct patch sizing, and consistent maintenance, is the most reliable way to extend roof life and avoid premature replacement.
| Point | Details |
|---|---|
| Inspect twice yearly | Schedule spring and fall inspections in DFW to catch damage before it escalates. |
| Clean before everything | Surface contamination is the leading cause of patch failure; clean thoroughly before applying any primer or adhesive. |
| Size patches correctly | Extend patches 50–75mm beyond visible damage and round all corners to prevent edge lifting. |
| Seal every edge | Apply EPDM-compatible lap sealant around all patch edges immediately after rolling to prevent failure. |
| Document all repairs | Maintain a dated photo log after every inspection and repair to track performance and support insurance claims. |
What I have learned about EPDM roofing in DFW after 20+ years
The most common mistake I see property owners make is treating an EPDM repair like a quick fix. They clean the surface halfway, skip the primer, and press the patch down without rolling it properly. Then they call us six months later wondering why the patch is peeling up. The repair itself is not complicated. The discipline to follow every step, in order, is what most people underestimate.
DFW’s climate punishes shortcuts harder than most regions. A patch applied in 95°F direct sun with adhesive that has already lost its tack will look fine for a few weeks. Then the first cold snap contracts the membrane, and the edge lifts. I have seen this pattern dozens of times. The fix costs three times as much as doing it right the first time would have.
The insight that changed how I approach EPDM work is this: EPDM roofs are modular systems, not monolithic surfaces. A damaged section does not mean the whole roof is failing. When you treat each repair as a precise, contained intervention and maintain the rest of the system actively, you can get decades of performance from a single installation. That mindset saves property owners real money. A full replacement is rarely necessary if the maintenance history is solid.
Keep records. Every repair, every inspection, every storm event. That file is worth more than you think when it comes time to negotiate with an insurance adjuster or decide between repair and replacement.
— Mark Griffith
Griffith roofing’s EPDM repair services for DFW property owners
Griffith roofing has served property owners and facility managers across the Dallas-Fort Worth Metroplex since 2001, and EPDM membrane repair is one of our most requested services.
Our team begins every job with a thorough inspection, including moisture detection, before any repair work starts. We use only EPDM-compatible materials and follow the full preparation and sealing workflow described in this guide. If you want professional EPDM roof repair handled correctly the first time, or if you need a second opinion on a repair that has already failed, Griffith roofing is ready to help. You can also explore our full range of roof repair services to find the right solution for your property. We do not consider the job done until you are completely satisfied.
FAQ
What is an EPDM roof repair workflow?
An EPDM roof repair workflow is the structured sequence of steps required to fix a damaged EPDM membrane, covering inspection, surface cleaning, patch sizing, adhesive application, edge sealing, and follow-up maintenance. Skipping any step in the sequence reduces the repair’s lifespan significantly.
How often should I inspect my EPDM roof in DFW?
Inspect your EPDM roof twice a year, in spring and fall, plus after any major hail or storm event. DFW’s hail season and summer heat cycles make consistent inspection scheduling especially important.
Can I repair an EPDM roof myself?
Yes, minor punctures and small tears are manageable with a standard EPDM patch kit, which starts at around $25. Larger damage, seam failures, or repairs near penetrations and flashings are best handled by a professional to avoid compounding the problem.
Why do EPDM patches fail so quickly?
Most patch failures trace back to inadequate surface cleaning, skipping primer, or applying adhesive outside the correct tack window. Neglecting lap sealant on patch edges is the other leading cause of early repair failure.
When should I replace rather than repair my EPDM roof?
Repair is the right choice when damage is localized and the surrounding membrane is still flexible and intact. Consider replacement when damage covers a large portion of the surface, when the membrane has become brittle and widespread, or when repeated repairs in the same area keep failing. Griffith roofing’s repair vs. replacement guide walks you through that decision in detail.


