

Why Stone Coated Roofing Installation Is One of the Best Upgrades You Can Make
Stone coated roofing installation is a proven way to protect your home for 50+ years while dramatically improving curb appeal and energy efficiency.
Here’s a quick overview of the core steps:
- Inspect and prep the deck – Remove old roofing, check for rot, and ensure the surface is clean and level
- Install underlayment – Minimum one layer of #30 felt (or two layers of #15), with proper overlaps
- Set the battens – 2×2 wood battens fastened into rafters at roughly 14.5-inch intervals
- Lay field panels – Start at the bottom, work upward, interlocking each course
- Fasten correctly – 6 screws per panel in field areas, 11 screws at perimeters
- Install valleys, hips, and ridges – Fit flashing, bird stops, and ridge caps with polyurethane sealant
- Touch up and clean – Remove all metal shavings and apply granule touch-up to any cut edges
Stone coated steel panels weigh less than 2 pounds per square foot – compared to 8-12 lbs for clay tile and 4.5 lbs for asphalt shingles. That means less stress on your home’s structure, faster installation, and safer handling throughout the process.
But getting it right takes careful planning. Skip a step – or use the wrong fastener – and you risk voiding your warranty or leaving your roof vulnerable to North Texas storms.
I’m Mark Griffith, founder of Griffith Roofing, and I’ve overseen more than 3,000 roof replacements across the DFW Metroplex since 2001, including countless stone coated roofing installation projects on suburban homes just like yours. This guide walks you through everything I’ve learned so you can approach the job with confidence.
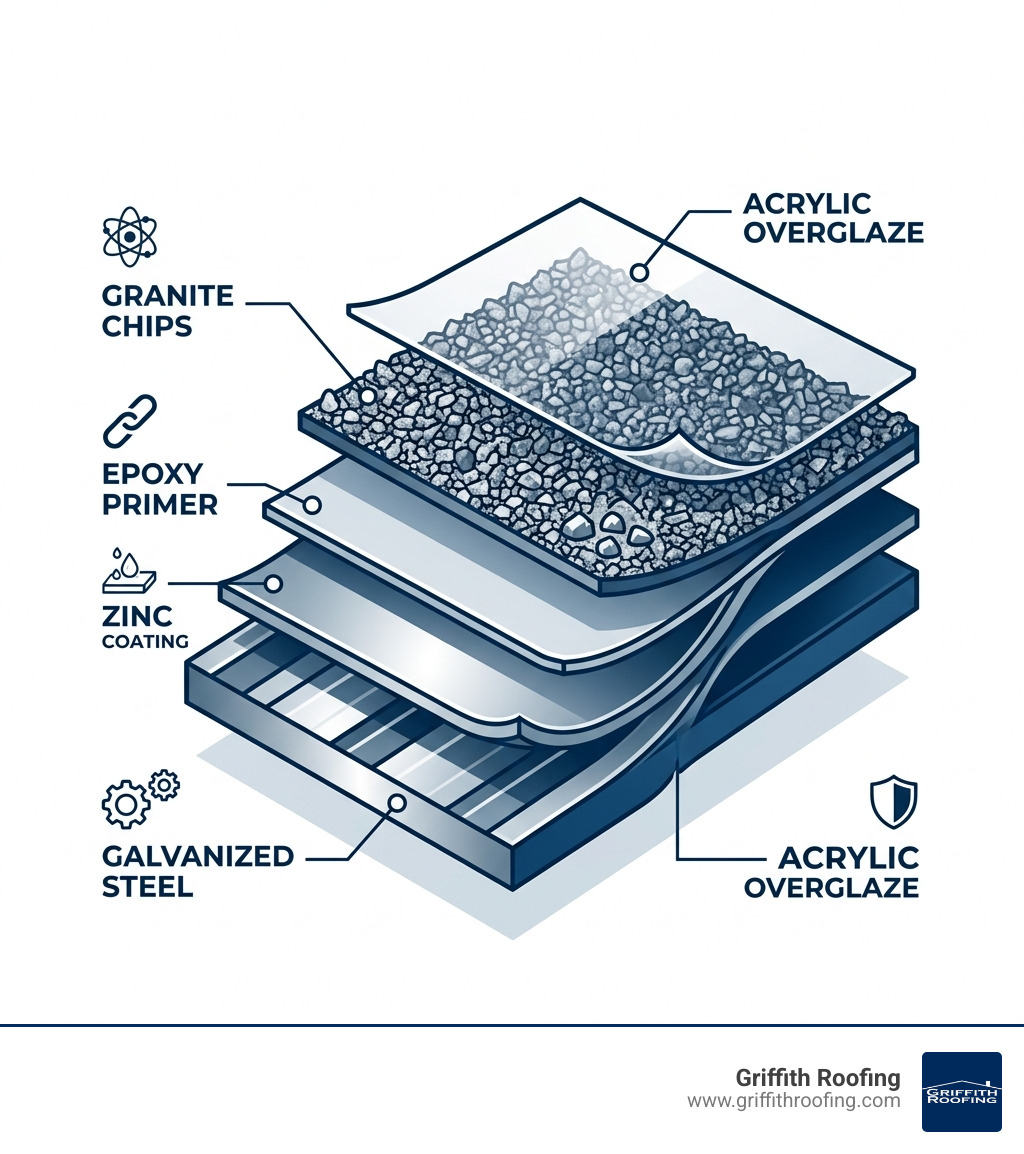
Essential Tools and Materials for Stone Coated Roofing Installation
Before you climb onto the roof, you need the right “arsenal.” This isn’t a project where you can just “wing it” with a standard hammer and a bucket of nails. Stone coated steel is a high-performance system, and it requires specific tools to ensure the interlocking panels stay weather-tight.
The Material Checklist
To get started, you’ll need your primary roofing panels (whether you chose a Shake, Shingle, or Roman profile), underlayment, and fasteners.
- Underlayment: We recommend a minimum of one layer of #30 felt or a high-quality synthetic underlayment. In our North Texas climate, especially in areas like Southlake or Keller, we often suggest an ice and water shield in valleys and along eaves for extra protection.
- Fasteners: You’ll need #8 x 1.5-inch galvanized screws with bonded washers. These are designed to resist the 1,000-hour salt spray corrosion test.
- Sealant: Use only roofing-grade polyurethane sealant. Stay away from acidic silicone, as it can react poorly with the metal coating.
Specialized Tools
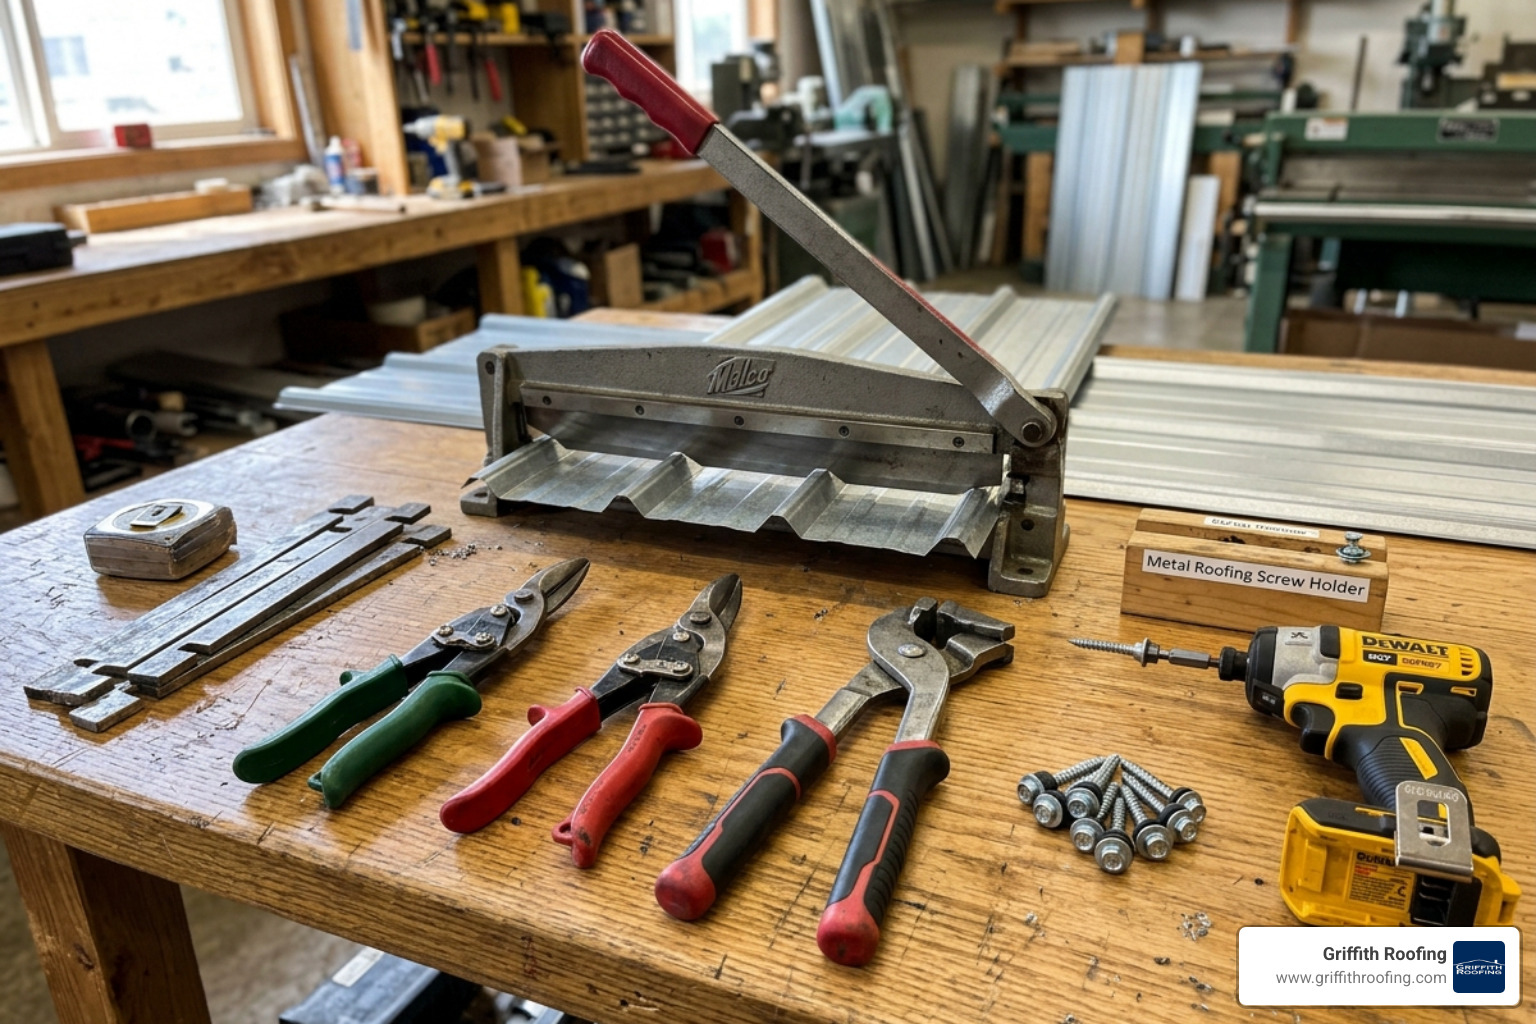
You can’t use an abrasive grinder to cut these panels—the heat will damage the protective zinc coating and lead to rust. Instead, you need:
- Specialized Cuters and Benders: A guillotine-style cutter and a hand bender are essential for creating the “upslope” and “downslope” bends at ridges and eaves.
- Batten Spacers: These ensure your wood or steel battens are perfectly parallel, which is critical for the panels to interlock.
- Impact Driver: For driving those galvanized screws at the correct 45-degree angle.
- Tin Snips: (Red and green) for fine detail work around vents and chimneys.
For more detailed information on how these materials come together, check out this Effortless Installation: Stone Coated Metal Roof Tiles Guide or explore our Residential Roofing page.
Preparing the Roof Deck and Underlayment
Preparation is the foundation of a successful stone coated roofing installation. If the deck isn’t right, the final product won’t be either.
Weight and Pitch Requirements
One of the biggest advantages we see in the DFW area is how light these roofs are. If you’re switching from heavy clay tiles to stone coated steel, you’re actually doing your home’s structure a huge favor.
| Material | Weight per Square Foot |
|---|---|
| Stone Coated Steel | < 2 lbs |
| Asphalt Shingles | 4.5 lbs |
| Clay/Concrete Tiles | 8 – 12 lbs |
Minimum Pitch: Most manufacturers require a minimum roof pitch of 3:12 (about 14 degrees) for a functional installation. If your roof is flatter than that, the panels are generally considered “decorative” and require a full secondary waterproof roof underneath.
The Prep Steps
- Tear-Off: While you can install over existing shingles in some cases, we almost always recommend a full tear-off down to the plywood. This allows us to inspect for rot or “deck deflection.”
- Deck Inspection: Replace any soft or water-damaged plywood. Ensure the deck is at least 15/32-inch thick.
- Drip Edge and Underlayment: Install your drip edge first. Then, lay your underlayment (ASTM D226 Type II) starting from the bottom and working up. Overlap horizontal rows by at least 4 inches and end-laps by 6 inches.
- Ice and Water Shield: In our local service areas like Flower Mound or Grapevine, we recommend extending this membrane at least 24 inches past the interior wall line at the eaves to prevent moisture backup.
If you’ve recently experienced a North Texas hailstorm, you might want to look into our Storm Damage services to see if an insurance-backed replacement is a better route than a DIY attempt.
Step-by-Step Stone Coated Roofing Installation Process
Now for the main event: putting the panels on. Most modern systems use a batten installation method, which creates an air gap between the roof deck and the metal. This “Above Sheathing Ventilation” (ASV) can reduce summer heat transfer into your home by up to 70%!
Setting the Battens
- Starter Batten: Place a 2×2 (nominal) wood batten flush with the fascia board.
- Spacing: Use your batten spacers to set the subsequent rows. For many Roman profiles, the first spacer is 14-3/8 inches, and every row after that is 14-7/8 inches on center.
- Fastening: Nail the battens into the rafters every 18 to 24 inches using 16d common nails. Within 30 inches of the roof perimeter, tighten that spacing to every 10 inches for better wind resistance.
Panel Interlocking
Stone coated panels are designed to interlock like a puzzle. You generally start from the top of the roof and work your way down, or from one side to the other depending on the specific profile (like Shake vs. Tile).
- The Overlap: Panels should overlap by roughly 1 to 2 inches. This creates a physical barrier that prevents water from “wicking” upward during heavy rain.
- Alignment: Ensure the “keyways” (the grooves in the panels) are staggered. Do not line them up vertically, as this creates a “seam” that water can follow.
For a deeper dive into these systems, see our Metal Roofing Solutions guide.
Layout and Fastening for Stone Coated Roofing Installation
Fastening is where many DIYers go wrong. It’s not just about “sticking a screw in it.”
- Field Panels: Use 6 approved screws per full panel. Space them roughly 12 inches on center.
- Perimeter Fastening: Along the eaves, rakes, and ridges, you need to “beef up” the security. Use 11 screws per panel, spaced about 7 inches apart.
- The 45-Degree Rule: For direct-to-deck or specific batten systems, drive the screws at a 45-degree downward angle through the “nose” or the front fold of the panel. This ensures the screw pulls the panel tight against the batten without over-driving and denting the metal.
- Wind Resistance: When properly fastened, these roofs can withstand winds up to 120 mph. In high-wind zones, we often use 7 fasteners even in the field courses to ensure total peace of mind.
Installing Valleys, Hips, and Ridges in Stone Coated Roofing Installation
The “details” make or break the roof. Most leaks don’t happen in the middle of a panel; they happen at the junctions.
- Valleys: You can choose an “Open Valley” or “Closed Valley.” For a cleaner look, the closed valley involves bending the panels down into the valley flashing. Ensure a minimum 6-inch overlap on valley sections.
- Hips and Ridges: Use Ridge Riser Brackets to hold a 2×2 wood nailer. Bend the field panels up at least 1 inch where they meet the ridge.
- Bird Stops: These are essential for profiles with high curves (like Barrel Vault). They prevent birds and debris from nesting under the panels.
- Flashings: Around chimneys and skylights, bend the panels up 2 inches against the wall. Use side flashing and a “saddle” on the high side of the chimney to divert water.
- Touch-Up Kits: Every time you cut a panel, you expose the raw steel edge. Use the manufacturer’s touch-up kit—apply the base adhesive, sprinkle the matching stone granules, and let it dry. This prevents rust and keeps the roof looking uniform.
Safety Protocols and Post-Installation Maintenance
Roofing is dangerous work. In April 2026, safety standards are stricter than ever, and for good reason.
Staying Safe on the Slope
- Fall Protection: Always use an OSHA-approved harness and anchor point.
- Footwear: Wear soft-soled, high-grip shoes.
- Walking on the Roof: This is critical! Walk only on the “nose” of the panels (the front edge) where they overlap the battens. Never walk on the side-laps or in the middle of a panel, as you can dent the steel.
- Weather: Never install on a wet roof. Stone coated steel becomes incredibly slippery when moisture is present.
Maintenance for Longevity
While stone coated steel is “low maintenance,” it isn’t “no maintenance.”
- Annual Inspections: Check for debris in the valleys and ensure the polyurethane sealant around vents hasn’t cracked.
- No Pressure Washing: High-pressure water can strip the stone granules. If you have algae or soot buildup, use a gentle garden hose and a soft brush.
- Metal Shavings: After installation, use a magnetic sweeper to remove all metal shavings. If left on the roof, these tiny bits of steel will rust and stain your beautiful new finish.
For help with ongoing care, visit our Roof Repair page.
Frequently Asked Questions about Stone Coated Steel
Can I install stone coated metal over existing shingles?
Yes, this is known as the “roof-over” method. Because stone coated steel is so light (less than 2 lbs/sq ft), most building codes in DFW allow it to be installed over one layer of asphalt shingles. However, we always check the local codes in cities like Plano or Frisco first. If the existing roof is “wavy” or has multiple layers, a full tear-off is necessary to ensure the new battens lie flat.
Are stone coated steel roofs noisy in the rain?
This is the #1 myth we hear! Because these panels are coated in stone granules and often installed on a batten system, they are actually no louder than an asphalt shingle roof. The air gap between the metal and the deck acts as a sound buffer, and the stone coating dampens the “pinging” sound of raindrops.
How long does the installation process take?
For a standard 2,000-square-foot home, a professional crew of 3 to 4 people can usually finish in 3 to 5 days. A DIYer should expect to take significantly longer—likely two or three weekends—given the learning curve for cutting and bending the metal. On a straight, walkable run, an experienced pro can lay up to 20 squares a day, but complex roofs with many chimneys and valleys will slow that down to 3 or 4 squares a day.
Conclusion
A stone coated roofing installation is a significant investment that pays off in durability, safety, and energy savings. Whether you are in Southlake, Colleyville, or anywhere else in the DFW area, choosing this material means you are likely installing the last roof your home will ever need.
At Griffith Roofing, we take pride in our “flawless craftsmanship” and our ability to handle the complex insurance side of roof replacement. If the DIY route feels a bit too daunting, or if you want the peace of mind that comes with a professional 50-year warranty, we are here to help.
Learn more about our Stone Coated Steel services and let’s get your home protected with the best the industry has to offer in 2026.


